Showing posts with label Blogger Tricks. Show all posts

Friday 11 October 2013

Add SOCIALIZE IT Bar Below Post Title In Blogger Blog

Social Buttons Plays a Crucial Role In Generating traffic From Social Sites..So Add These Buttons Under Post Title Will Increases Traffic

Adding SOCIALIZE IT Below Post Title In Blogger

Implementing this new horizontal social bookmarking button bar below post title in blogger is not a difficult task..Follow The Below Steps To Add Them Easily
  • Go To Blogger >> Template >> Backup Your Template
  • Click Edit HTML and Find For </head>  (Want help to find code Click Here)
  • Just Above </head> Paste The Following Code.
<style type='text/css'>
/*<![CDATA[*/
    .horizontalsocial .sharertitle{float: left; border-right: 1px solid #d2d2d2; padding: 3px 10px 2px 0px; margin: 0 0px 0 0; color: #b1a9a5; font-family:'Oswald', Arial, Helvetica, sans-serif;text-transform: uppercase; line-height: 25px; vertical-align: middle;  font-size: 14px;}
    .horizontalsocial .fb-like{width: 100px; float: left; border-right: 1px solid #d2d2d2; padding: 3px 0 2px;  height: 25px; }
    .horizontalsocial .sharertwitter{float: left; width: 115px; border-right: 1px solid #d2d2d2; margin: 0 15px 0 0; padding: 3px 0 2px; height: 25px;}
    .horizontalsocial .sharergplus{float: left; width: 90px; margin: 0 15px 0 15px; padding: 3px 0 2px; border-right: 1px solid #d2d2d2; height: 25px;}
    .horizontalsocial .sharerbubble{background: url(http://2.bp.blogspot.com/-Zenaemr3nKw/USzIGk9FTTI/AAAAAAAAB6A/1_wR3MU5Wms/s1600/Commentz.png) no-repeat;  height: 25px; min-width: 25px; float: left; margin: 7px 0 0; line-height: 18px; vertical-align: top;}
    .horizontalsocial .sharerbubble a{color: #2d2520;  padding: 0px 0 0px 30px; font-size: 18px !important; font-family: 'Lora', Arial, Helvetica, san-serif !important; }
    .horizontalsocial.fixed{ position:fixed; top: -2px; z-index: 99999;}
    #nbtsocialshare {clear:both;padding: 6px 0;display:block;background:#FFFFFF;}
    #nbtsocialshare td{padding:4px;margin:0;border:none;}
    #nbtsocialshare td iframe{max-width:82px;width:82px !important;}
    #nbtsocialshare.nbtFloatSocial{position: fixed;top:0;z-index:9999999;border-bottom:1px solid #ccc;-webkit-box-shadow:0 1px 1px rgba(0,0,0,0.15);-moz-box-shadow:0 1px 1px rgba(0,0,0,0.15);box-shadow:0 1px 1px rgba(0,0,0,0.15);}
/*]]>*/
</style>
<script type='text/javascript'>
/*<![CDATA[*/
// Set the Top Offset
$theOffset = 0;
jQuery(document).ready(function(b){var a=b("#nbtsocialshare");a.wrap('<div id="nbtSocialPlaceholder"></div>').closest("#nbtSocialPlaceholder").height(a.outerHeight());a.width(a.outerWidth());e=a.offset().top-$theOffset;b("#nbtsocialshare iframe[src*=plusone]").closest("div").css("max-width","82px");b(window).scroll(function(){d=b(this).scrollTop();d>=e?a.addClass("nbtFloatSocial"):a.removeClass("nbtFloatSocial");f=b(".post");if(f.length!=0){c=f.outerHeight()+f.offset().top;d>=c?a.stop().animate({top:"-150px"}):a.stop().animate({top:$theOffset+"px"})}else d>=e?a.css("top",$theOffset+"px"):a.css("top","0")})});
/*]]>*/
</script>
<script type='text/javascript'>
/*<![CDATA[*/
// Twitter
(function(a,b,c){var d=a.getElementsByTagName(b)[0];if(!a.getElementById(c)){a=a.createElement(b);a.id=c;a.src="//platform.twitter.com/widgets.js";d.parentNode.insertBefore(a,d)}})(document,"script","twitter-wjs");
// Google + (plus)
(function(){var a=document.createElement("script");a.type="text/javascript";a.async=true;a.src="https://apis.google.com/js/plusone.js";var b=document.getElementsByTagName("script")[0];b.parentNode.insertBefore(a,b)})();

/*]]>*/
</script>

  • Now  Find For <div class='post-body entry-content'>
  • And Just Above/Before It Add The Following Code...
<b:if cond='data:blog.pageType == &quot;item&quot;'>
<div class='horizontalsocial social-buttons' id='horizontalsocial'>
<div class='nbtsocialshare' id='nbtsocialshare'>
<table class='nbtsocialshare' width='100%'>
    <tr>
<td><div class='sharertitle'>Socialize It &#8594;</div>
</td>
        <td>
            <div class='sharertwitter'><a class='twitter-share-button' expr:data-text='data:post.title' expr:data-url='data:post.url' href='https://twitter.com/share'>Tweet</a></div>
        </td>
        <td>
        <div class='fb-like'>    <iframe allowTransparency='true' expr:src='&quot;//www.facebook.com/plugins/like.php?href=&quot; + data:post.url + &quot;&amp;send=false&amp;layout=button_count&amp;width=80&amp;show_faces=false&amp;action=like&amp;colorscheme=light&amp;font&amp;height=21&quot;' frameborder='0' scrolling='no' style='border:none; overflow:hidden; width:80px; height:21px;'/></div>
        </td>
     
        <td>
        <div class='sharergplus'>    <div class='g-plusone' data-size='medium' expr:data-href='data:post.url'/></div>
        </td>
     
        <td>
<div class='sharerbubble'><span class='thecomments'>
<b:if cond='data:post.allowComments'>
<a class='comment-link' expr:href='data:post.addCommentUrl' expr:onclick='data:post.addCommentOnclick'><b:if cond='data:post.numComments == 1'>1 <b:else/><data:post.numComments/> </b:if></a>
</b:if>
</span></div>
</td>
    </tr>
</table>
</div></div>
</b:if>


  • Click Save Template and You're  Done!
  • Go To Your Blog And Check It Below Post Title
  • If  you are getting any single problem then feel free to mention it via comments,I will reply as soon as possible.
Update :
    Make This Bar Floating By Following Below Step

    On The Second Code  Replace 
    <div class="horizontalsocial social-buttons" id="horizontalsocial">
    With
    <div class="horizontalsocial social-buttons" id="horizontalsocial"style="position: fixed;">


    Saturday 28 September 2013

    Add Custom Page Link In Address Bar Of Blogger Blog

    Are You Created New Page  ?
    In address Bar It Is Showing   as /p/blog-page.html Instead Of Original Name ??
    Change The Link Of Any Page Easily As You Like By Following 
    • First Go To pages Tab on Blogger
    • Click On New Page >> Blank Page and Enter The Page Title As You Like
    • Now Click On Publish Without Writing Any Thing On That Page
    • Now Check The Page Link It Will Definitely The Name You Entered
    • Now Edit The Page And Write On That Page.
    If You Want To Share This On Your Blog Give A Link Back to Our Site

    This Is A Simple Blogger Trick,if still you are getting any single problem then feel free to mention it via comments,We will reply as soon as possible.


    Friday 27 September 2013

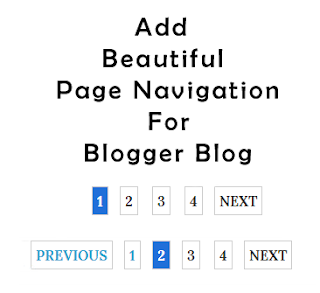
    Beautiful Page Navigation for Blogger Blog

    Blogger Page Navigation is an awesome trick to navigate your Blogger Blog Pages.By using this In your blog visitors can easily go to an appropriate page.By default Blogger allows Older Posts and Newer Posts link to Navigate between Blog pages.It is very difficult for your users to navigate deeper into your Blog's Posts, so the Page Navigation helps us to solve this problem.


    So add This To Your Blog By Following Simple Steps Below
    • Log In to your Blogger Account
    • Go To Layout Tab And Select Add a Widget
    • Then select HTML/JavaScript And Paste The Below Code Inside It
    <style type='text/css'>#blog-pager{height: 28px;    padding: 10px 0 0;overflow:hidden;text-align:center;}.showpageArea a {text-decoration:underline;font-size: 16px;       text-align: center;}.showpageNum a {font-size:16px;text-decoration:none;border: 1px solid #cccccc;margin:0 5px;padding:5px;}.showpageNum a:hover {border: 1px solid #cccccc;background-color:#cccccc;}
    .showpagePoint {font-size:16px;text-decoration:none;border: 1px solid #cccccc;background: #216FD9;margin:0 5px;padding:5px;color:#ffffff;}
    .showpageOf {text-decoration:none;padding:5px;margin: 0 5px;}.showpage a {text-decoration:none;border: 1px solid #cccccc;padding:5px;}.showpage a:hover {text-decoration:none;background: #cccccc;}.showpageNum a:link,.showpage a:link {text-decoration:none;color:#333333;}</style><script style='text/javascript'>var pageCount=7; var displayPageNum=5;var upPageWord="Previous";var downPageWord="Next";</script><a href="http://www.newblogger-tricks.com" style="font-size:0pt">Nbt Widgets</a><script style='text/javascript' src='http://newbloggertricks.googlecode.com/svn/newbloggertricks-page-nav-v2.js'></script>

    Customization :

     If You Want To Change The No.Of Posts Appear per page

    • Change pageCount=
    • Go to Settings >> Posts and Comments and Change as Show In Fig
    Finally save your Widget and visit your Blog You Will Find The Page Navigation At The end Of Page.We have kept the installation one step installation,if still you are getting any single problem then feel free to mention it via comments,We will reply as soon as possible.


    Thursday 26 September 2013

    Awesome Recent Comments Widget With Avatars for Blogger (Single Step)


    Recent Comment Widget Helps You To Get More Comments On Your Blog
    So We Are Released Recent Comments Widget With Avatars for Blogger.Just In One Click You Will Add It To Your Blog...


    Recent Comments Widget Generator

    • In Customize Field Enter The Name Of Your Blog/Website With Http://
    • Click on Generate Button and Add To Blogger Button Respectively.
    • Another page will appear follow simple instruction that set.
    • You Can Watch Demo (In New Tab) By Clicking on Demo

    We have kept the installation one step installation,if still you are getting any single problem then feel free to mention it via comments,We will reply as soon as possible.


    Tuesday 24 September 2013

    Add Multi Colored Popular Posts Widget for Blogger

    This Is a Widget Which Gives Multi Coloring To Our Old Popular Post Widget..

    Steps To Add This To Your Blog Post
    • Go To Blogger >> Template >> Backup Your Template
    • Click Edit HTML >> Search For ]]></b:skin> (Want help to find Click Here)
    • Now Paste The Following code Above/Before ]]></b:skin>


    <!-- Popular posts multi colored theme -->
    #PopularPosts1 ul{margin:0;padding:5px 0;list-style-type:none}
    #PopularPosts1 ul li{position:relative;margin:5px 0;border:0;left:-27px;padding:10px}
    #PopularPosts1 ul li:first-child{background:#ff4c54;width:97%}
    #PopularPosts1 ul li:first-child:after{content:"1"}
    #PopularPosts1 ul li:first-child + li{background:#ff764c;width:87%}
    #PopularPosts1 ul li:first-child + li:after{content:"2"}
    #PopularPosts1 ul li:first-child + li + li{background:#ffde4c;width:84%}
    #PopularPosts1 ul li:first-child + li + li:after{content:"3"}
    #PopularPosts1 ul li:first-child + li + li + li{background:#c7f25f;width:81%}
    #PopularPosts1 ul li:first-child + li + li + li:after{content:"4"}
    #PopularPosts1 ul li:first-child + li + li + li + li{background:#33c9f7;width:78%}
    #PopularPosts1 ul li:first-child + li + li + li + li:after{content:"5"}
    #PopularPosts1 ul li:first-child + li + li + li + li +li{background:#7ee3c7;width:75%}
    #PopularPosts1 ul li:first-child + li + li + li + li + li:after{content:"6"}
    #PopularPosts1 ul li:first-child + li + li + li + li + li +li{background:#f6993d;width:72%}
    #PopularPosts1 ul li:first-child + li + li + li + li + li + li:after{content:"7"}
    #PopularPosts1 ul li:first-child + li + li + li + li + li + li +li{background:#f59095;width:69%}
    #PopularPosts1 ul li:first-child + li + li + li + li + li + li + li:after{content:"8"}
    #PopularPosts1 ul li:first-child + li + li + li + li + li + li + li +li{background:#c7f25f;width:66%}
    #PopularPosts1 ul li:first-child + li + li + li + li + li + li + li + li:after{content:"9"}
    #PopularPosts1 ul li:first-child:after,
    #PopularPosts1 ul li:first-child + li:after,
    #PopularPosts1 ul li:first-child + li + li:after,
    #PopularPosts1 ul li:first-child + li + li + li:after,
    #PopularPosts1 ul li:first-child + li + li + li + li:after,
    #PopularPosts1 ul li:first-child + li + li + li + li + li:after,
    #PopularPosts1 ul li:first-child + li + li + li + li + li + li:after,
    #PopularPosts1 ul li:first-child + li + li + li + li + li + li + li:after,
    #PopularPosts1 ul li:first-child + li + li + li + li + li + li + li + li:after{position:absolute;top:20px;right:-15px;border-radius:50%;background:#353535;width:30px;height:30px;text-align:center;font-size:28px;color:#fff}
    #PopularPosts1 ul li .item-thumbnail{float:left;border:0;margin-right:10px;background:transparent;padding:0;width:70px;height:70px;}
    #PopularPosts1 ul li a{font-size:13px;color:#444;text-decoration:none}
    #PopularPosts1 ul li a:hover{color:#222;text-decoration:none}
    #PopularPosts1 img{
    -moz-border-radius: 130px;
    -webkit-border-radius: 130px;
    border-radius: 130px;
    -webkit-transition: all 0.3s ease;
    -moz-transition: all 0.3s ease;
    transition: all 0.3s ease;
    padding:4px;
    border:1px solid #fff !important;
    }
    #PopularPosts1 img:hover {
    border-radius: 0 0 0 0;
    -moz-transform: scale(1.2) rotate(-711deg) ;
    -webkit-transform: scale(1.2) rotate(-711deg) ;
    -o-transform: scale(1.2) rotate(-711deg) ;
    -ms-transform: scale(1.2) rotate(-711deg) ;
    transform: scale(1.2) rotate(-711deg) ;
    }
    <!-- popular posts multicolored by nbt-->
    •  Now Save The Template
    • Go To Your Blog And Check
    We have kept the installation one step installation,if still you are getting any single problem then feel free to mention it via comments,We will reply as soon as possible.


    Add Mashable Sharing Widget For Blogger v.2 (One Step Process)

    We Are already Discussed About Mashable Sharing Widget V.1 Now I am Going To Give a new Method V.2 to Add In A One Step Process


    • In Customize Field Replace All The Names With Corresponding Usernames Of Your Profile 
    • Click on Generate Button and Add To Blogger Button Respectively.
    • Another page will appear follow simple instruction that set.
    • You Can Watch Demo (In New Tab) By Clicking on Demo

    We have kept the installation one step installation,if still you are getting any single problem then feel free to mention it via comments,We will reply as soon as possible.


    Sunday 22 September 2013

    Add Email Subscription Widget Below Blogger Posts v.1

    Email Subscription Widget Below Blogger Posts Increases Your Feed Count As It Appears Under Every Post. Just Follow Simple Instructions To Add This To Your Blog

     Widget Generator :

    • In Customize Field Enter Your Feed Burner ID In Corresponding Box
    • Click on Generate Button 
    • You Can Watch Demo (In New Tab) By Clicking on Demo
    • Copy The Generated Code And Follow Below Steps

    Copy The Generated Code And Follow below Steps
    • First go to Blogger Dashboard > Template
    • Download a copy of your template
    • Click on Edit HTML
    • Find below code in your template (Want help to find code Click Here)
    <data:post.body/>

    • If You Find Three <data:post.body/> Then Add The Code After or Below 2nd One 

    Finally save your template and visit your any post you will watch this widget after posts ends.I have kept the installation one step installation,if still you are getting any single problem then feel free to mention it via comments,I will reply as soon as possible.

    Direct Mode :

    • First go to Blogger Dashboard > Template
    • Download a copy of your template
    • Click on Edit HTML
    • Find below code in your template (Want help to find code Click Here)
    <data:post.body/>
    If You Find Three <data:post.body/> Then Add Below Code After or Below 2nd One

    <style>
    .topsubsbox {
    background: none repeat scroll 0 0 #292929;
    border-radius: 0px 0px 0px 0px;
    color: #FFFFFF;
    font-size: 14px;
    height: auto;
    margin-left: -7px;
    padding: 15px;
    transition: border-radius 0.5s ease 0s;
    width: auto;
    }
    .topsubsbox:hover {
    border-radius: 0px 30px 0px 30px;
    }
    .topsubsbox p {
    line-height: 21px;
    text-align: justify;
    width: auto;
    }
    .subsbox {
    float: right;
    margin: 0 106px;
    }
    #subbox {
    background: url("http://2.bp.blogspot.com/-dcien5QLnB8/UOb4N7eNU1I/AAAAAAAAAhw/NxzO8UXjgG4/s1600/subscribe-email.png") no-repeat scroll right center white;
    color: #888888;
    padding: 10px;
    width: auto;
    }
    #subbutton {
    background: none repeat scroll 0 0 #0089E0;
    border: 1px solid #292929;
    border-radius: 0px 0px 0px 0px;
    color: #FFFFFF;
    font-weight: bold;
    height: 40px;
    margin-top: 15px;
    text-transform: uppercase;
    transition: border-radius 0.5s ease 0s;}
    #subbutton:hover {
    border-radius: 18px 0px 18px 0px;}
    </style>
    <br />
    <div class="topsubsbox">
    <div style="font-family: oswald; font-size: 20px; letter-spacing: 1px; text-align: center;">
    Don't Miss a Single Post ! Join Us Now !</div>
    <div class="subsbox">
    <form action="http://feedburner.google.com/fb/a/mailverify" id="subscribe" method="post" onsubmit="window.open( 'http://feedburner.google.com/fb/a/mailverify?uri=newblogger-tricks', 'popupwindow', 'scrollbars=yes,width=550,height=520');return true" target="popupwindow">
    <input id="subbox" name="email" onblur="if ( this.value == '' ) { this.value = 'your email address';}" onfocus="if ( this.value == 'your email address') { this.value = ''; }" type="text" value="your email address" />
    <input name="uri" type="hidden" value="newblogger-tricks" />
    <input name="loc" type="hidden" value="en_US" />
    <input id="subbutton" type="submit" value="Send Updates!" />
    </form>
    </div>
    <br />
    <div style="color: #05a4d5; font-size: 9px; letter-spacing: 2px; margin-top: 25px; text-align: center;">
    Note: Don't forget to click the confirmation link (in your email) to verify Your Entry!</div>
    </div>
    <div style="clear: both;">

    • Replace  newblogger-tricks with your Feedburner Username
    Finally save your template and visit your any post you will watch this widget after posts ends.I have kept the installation one step installation,if still you are getting any single problem then feel free to mention it via comments,I will reply as soon as possible.


    Saturday 21 September 2013

    Add Rainbow Animation To Links For Your Blogger Blog

    This is a simple Blogger Blog Trick,Changing the color of Link when Mouse over it.7 colors are changing like animation when hover the link.
    Hover On Any Link To See on demo site


    Follow the simple steps below..
    • Sign in To Your Blogger Account and Select Blog That You Want To ADD This Widget then goto
    • Template Tab >> Edit HTML
    • Then Add The Below Code Above or Before </head>  (Want help to find Click Here)
    <script type='text/javascript'>//<![CDATA[var rate = 20;if (document.getElementById)window.onerror=new Function("return true")var objActive;  // The object which event occured invar act = 0;    // Flag during the actionvar elmH = 0;   // Huevar elmS = 128; // Saturationvar elmV = 255; // Valuevar clrOrg;     // A color before the changevar TimerID;    // Timer IDif (document.all) {document.onmouseover = doRainbowAnchor;document.onmouseout = stopRainbowAnchor;}else if (document.getElementById) {document.captureEvents(Event.MOUSEOVER | Event.MOUSEOUT);document.onmouseover = Mozilla_doRainbowAnchor;document.onmouseout = Mozilla_stopRainbowAnchor;}function doRainbow(obj){if (act == 0) {act = 1;if (obj)objActive = obj;elseobjActive = event.srcElement;clrOrg = objActive.style.color;TimerID = setInterval("ChangeColor()",100);}}function stopRainbow(){if (act) {objActive.style.color = clrOrg;clearInterval(TimerID);act = 0;}}function doRainbowAnchor(){if (act == 0) {var obj = event.srcElement;while (obj.tagName != 'A' && obj.tagName != 'BODY') {obj = obj.parentElement;if (obj.tagName == 'A' || obj.tagName == 'BODY')break;}if (obj.tagName == 'A' && obj.href != '') {objActive = obj;act = 1;clrOrg = objActive.style.color;TimerID = setInterval("ChangeColor()",100);}}}function stopRainbowAnchor(){if (act) {if (objActive.tagName == 'A') {objActive.style.color = clrOrg;clearInterval(TimerID);act = 0;}}}function Mozilla_doRainbowAnchor(e){if (act == 0) {obj = e.target;while (obj.nodeName != 'A' && obj.nodeName != 'BODY') {obj = obj.parentNode;if (obj.nodeName == 'A' || obj.nodeName == 'BODY')break;}if (obj.nodeName == 'A' && obj.href != '') {objActive = obj;act = 1;clrOrg = obj.style.color;TimerID = setInterval("ChangeColor()",100);}}}function Mozilla_stopRainbowAnchor(e){if (act) {if (objActive.nodeName == 'A') {objActive.style.color = clrOrg;clearInterval(TimerID);act = 0;}}}function ChangeColor(){objActive.style.color = makeColor();}function makeColor(){// Don't you think Color Gamut to look like Rainbow?// HSVtoRGBif (elmS == 0) {elmR = elmV;    elmG = elmV;    elmB = elmV;}else {t1 = elmV;t2 = (255 - elmS) * elmV / 255;t3 = elmH % 60;t3 = (t1 - t2) * t3 / 60;if (elmH < 60) {elmR = t1;  elmB = t2;  elmG = t2 + t3;}else if (elmH < 120) {elmG = t1;  elmB = t2;  elmR = t1 - t3;}else if (elmH < 180) {elmG = t1;  elmR = t2;  elmB = t2 + t3;}else if (elmH < 240) {elmB = t1;  elmR = t2;  elmG = t1 - t3;}else if (elmH < 300) {elmB = t1;  elmG = t2;  elmR = t2 + t3;}else if (elmH < 360) {elmR = t1;  elmG = t2;  elmB = t1 - t3;}else {elmR = 0;   elmG = 0;   elmB = 0;}}elmR = Math.floor(elmR).toString(16);elmG = Math.floor(elmG).toString(16);elmB = Math.floor(elmB).toString(16);if (elmR.length == 1)    elmR = "0" + elmR;if (elmG.length == 1)    elmG = "0" + elmG;if (elmB.length == 1)    elmB = "0" + elmB;elmH = elmH + rate;if (elmH >= 360)elmH = 0;return '#' + elmR + elmG + elmB;}//]]></script>


    • Save Your Template After Adding Code
    Thanks For Reading This Article.If You Found Any Errors In My Post Please Feel Free To Comment Below


    How to Change Text Select Highlight Color on Blogger Blog

    You Can easily Change Text Select Highlight Colour By Adding A Small Css Code To Your Blogger Template..This can ensure that when users highlight text on your blog, it matches your blog’s theme, and may also look professional at the same time.


    Follow These Simple Steps :

    • Sign in To Your Blogger Account and Select Blog That You Want To ADD This Widget then goto
    • Template Tab >> Edit HTML
    • Then Add The Below Code Below or After </head> (Want help to find Click Here)
    <style type='text/css'>
     ::selection {background:#00624b;color:#ffffff;}
     ::-moz-selection{background:#00624b;color:#ffffff;}
    </style>

    • Then Save Your Template
    • You Can Change The Selecting Colour By Replacing #00624b with Code Of Your Colour
    Try Our Html Colour Code Generator Nbt Colour Codes


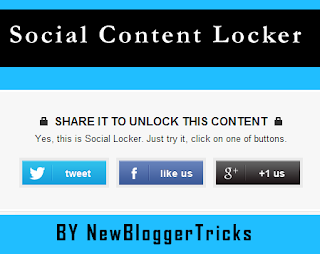
    How To Create a Social Content Locker in Blogger Blog

    Social Content Locker is Used To Lock Specific text  And Images
    You Can Easily Install Social Content Locker By Following Simple Steps


    • Sign in To Your Blogger Account and Select Blog That You Want To ADD This Widget

    • Then Go To Template Tab  >>  Edit HTML

    • Then Add The Below Code Before or Above </head> (Want help to find Click Here)
    <link href='http://newblogger-tricks.webege.com/locker.css' rel='stylesheet' type='text/css'/>
    • Now Go To The Post/Page you want to Lock Content And Add Below Code In HTML Tab

    <article id="default-usage">
    <div class="to-lock" style="display: none;">
    <!--Hidden Content Starts (You can Use HTML BELOW)-->
    <div style="text-align: center; margin-bottom: 20px;">
    <img src="Add_Hidden_Image_Here" alt="" style="margin: auto;" />
    </div>

    <div style="text-align: justify">
    Add Your Hidden Text Here</div>

    <!--Hidden Content Ends (You can Use HTML ABOVE)-->

    </article>
    </div><div id="nbtunlocker"> </div>
    <script type="text/javascript" src="http://newbloggertricks.googlecode.com/svn/lock.js"></script>
    <script>
    jQuery(document).ready(function ($) {
    $("#default-usage .to-lock").socialLock({
    text: {
    header: "Share it To Unlock This Content",
    message: "Yes, this is Social Locker. Just try it, click on one of buttons."
    },
    style: "ui-social-locker-secrets",
    buttons: {
    order: ["twitter", "facebook", "google"]
    },
    // twitter options
    twitter: {
    url: "http://www.newblogger-tricks.com",
    text: "Upgrade your social buttons to get more social traffic!"
    },
    // facebook options
    facebook: {
    url: "http://www.facebook.com/newbloggertrcks",
    appId: "706100816073140"
    },
    google: {
    url: "http://www.newblogger-tricks.com"
    }
    });
    });;;;
    </script>


    • For Facebook: Replace http://www.facebook.com/newbloggertrcks  with your Facebook Page.
    • For Twitter: Replace http://www.newblogger-tricks.com with your Website's URL or etc. 
    • For Google+: Replace http://www.newblogger-tricks.com with the URL of your website or post.
    • Replace Add_Hidden_Image_Here with the Image that you want to Hide.
    • Replace "Add Your Hidden Text Here" With the text that you want to hide from users.

    Remember: Don't forgot to Add Facebook App ID otherwise the Facebook Like button will not appear properly. i.e. Replace 706100816073140 from above coding.


    Monday 16 September 2013

    How to Change Your Blog ScrollBar

    Change Your Blog's Scroll Bar Which Gives Good View Of Your Blog


    You Can see Changed Scroll Bar On Right Side Of My Blog

    Steps To Add This To Your Blog
    • Go To Blogger >> Template >> Backup Your Template
    • Click Edit HTML >> Search For ]]></b:skin>  (Want help to find Click Here)

    • Now Paste The Following code Above/Before ]]></b:skin>


    /* Webkit override Scrollbar with CSS3 By NBT */
    ::-webkit-scrollbar {
    width: 12px; height:8px;
    }
    ::-webkit-scrollbar-track {
    -webkit-box-shadow: inset 0 0 4px rgba(0,0,0,0.3);
    background:#fff;
    }
    ::-webkit-scrollbar-thumb {
    background: rgb(62,201,187);
    -webkit-box-shadow: inset 0 0 6px rgba(0,0,0,0.5);
    }
    ::-webkit-scrollbar-thumb:window-inactive {
    background: rgb(62,201,187);

    If You Want To Customise The Colour Then  change rgb(62,201,187) as your Desired Colour
    You Can Also Change Width And Height by Changing 12px and 8px

    Please write comments about this tutorial or tell me any faults which you found while creating and publishing. I will always there to help you....


    Saturday 14 September 2013

    Add Stylish Success , Announce , Note and Warning Boxes For Your Blog


    Add Stylish Sucess , Announce , Note and Warning Boxes For Your Blogger Blog..Use These To Show Your Notifications...

    Steps To Add This To Your Blog Post
    1. Go To Blogger >> Template >> Backup Your Template
    2. Click Edit HTML >> Search For   ]]></b:skin>  (Want help to find Click Here)

         3. Now Paste The Following code Above/Before  ]]></b:skin>

      @font-face {
          font-family: 'Open Sans';
          font-style: normal;
          font-weight: 400;
          src: local('Open Sans'), local('OpenSans'), url(http://themes.googleusercontent.com/static/fonts/opensans/v6/cJZKeOuBrn4kERxqtaUH3T8E0i7KZn-EPnyo3HZu7kw.woff) format('woff');
        }
        @font-face {
          font-family: 'Open Sans';
          font-style: normal;
          font-weight: 700;
          src: local('Open Sans Bold'), local('OpenSans-Bold'), url(http://themes.googleusercontent.com/static/fonts/opensans/v6/k3k702ZOKiLJc3WVjuplzHhCUOGz7vYGh680lGh-uXM.woff) format('woff');
        }


        .nbt_message_box {
          margin:15px 0;
        }

        .note {
          color:#666;
          font-family:"Open Sans";
          font-size:16px;
          border:1px solid #FDEBA5;
          background:url(http://2.bp.blogspot.com/-hQXstgVAlic/UjQtgBWW4PI/AAAAAAAAAjc/GTT5GaKWa_A/s1600/Nbt+Notification.png) no-repeat scroll 10px center #FEF4C8;
          padding:.5em 1em .5em 3em;
        }

        .announce {
          color:#666;
          font-family:"Open Sans";
          font-size:16px;
          border:1px solid #BEE5F8;
          background:url(http://4.bp.blogspot.com/-Q1nta4EsRQg/UjQtfC0Vo0I/AAAAAAAAAjg/Hh-rs4Bxz_w/s1600/NBT+Announce.png) no-repeat scroll 10px center #D7EFFB;
          padding:.5em 1em .5em 3em;
        }

        .success {
          color:#666;
          font-family:"Open Sans";
          font-size:16px;
          border:1px solid #DEF1BF;
          background:url(http://3.bp.blogspot.com/-YXcCe1ahewo/UjQtfJuNKRI/AAAAAAAAAjM/Ycr6OT868DQ/s1600/NBT-Sucess.png) no-repeat scroll 10px center #E8F6D2;
          padding:.5em 1em .5em 3em;
        }

        .warning {
          color:#666;
          font-family:"Open Sans";
          font-size:16px;
          border:1px solid #FFDBDB;
          background:url(http://3.bp.blogspot.com/-WcTPBACALLE/UjQtfGCRVfI/AAAAAAAAAjQ/oRRlQXuIJ0A/s1600/NBT+Warning.png) no-repeat scroll 10px center #FFE7E7;
          padding:.5em 1em .5em 3em;
        }
      <br />

           4. Now Save Your Template

      Do You Want To Add These Boxes To Your Posts Follow The Below Steps
      1. Go To Blogger >> Create New Post
      2. And Go To The HTML Tab
      3. Copy The Below Codes Of Boxes
      4. And Paste The Code In  In  HTML Tab.

      Note Box :

      <div class="nbt_message_box note">
      Hello This Is NBT-Notification Box
      </div>

      Success Box :

      <div class="nbt_message_box success">
      Hello This Is NBT-Success Box
      </div>

      Announce Box : 

      <div class="nbt_message_box announce">
      Hello This Is NBT-Announcement Box
      </div>

      Warning Box : 

      <div class="nbt_message_box warning">
      Hello This Is NBT-Warning Box
      </div>

      • Replace The Red Text With The Your Message
      • And Publish The Post.


      Wednesday 11 September 2013

      How To Remove "POWERED BY BLOGGER" Attribution Gadget ?

      We all know that Blogger is a Great Platform where we can Show Our Influence of designing.
      The attribution gadget at footer of blog and says "Powered by Blogger".

      The gadget is locked,when you click on the edit link of attribution gadget you will notice that there is no Remove link,Because the gadget is locked officially by the blogger.If You Want To unlock the gadget follow my below easy steps carefully.


      How To Remove Blogger Attribution Gadget


      Go to Blogger Dashboard > Design > Edit HTML.(In new User Interference it is Dashboard > Template) 
      As always download a copy of your template


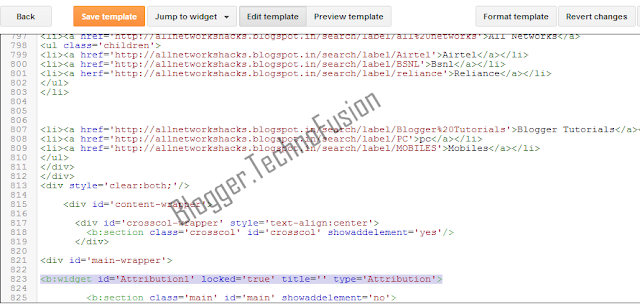
      Now search for below code in your template


      <b:widget id='Attribution1' locked='true' title='' type='Attribution'>


      Replace
      locked='true'


      with
      locked='false'


      as shown below


      Now save your template and go to Layout page. Click on the edit link of attribution widget.


      Hit Remove button and you are done.

      Thanks for reading......

      Please write comments about this tutorial or tell me any faults which you found while creating and publishing. I will always there to help you...


      Monday 4 March 2013

      HOW TO REMOVE "POWERED BY BLOGGER" ATTRIBUTION GADGET ?

      We all know that Blogger is a Great Platform where we can Show Our Influence of designing.
      The attribution gadget at footer of blog and says "Powered by Blogger".

      The gadget is locked,when you click on the edit link of attribution gadget you will notice that there is no Remove link,Because the gadget is locked officially by the blogger.If You Want To unlock the gadget follow my below easy steps carefully.


      How To Remove Blogger Attribution Gadget


      Go to Blogger Dashboard > Design > Edit HTML.(In new User Interference it is Dashboard > Template)
      As always download a copy of your template


      Now search for below code in your template


      <b:widget id='Attribution1' locked='true' title='' type='Attribution'>


      Replace
      locked='true'


      with
      locked='false'


      as shown below


      Now save your template and go to Layout page. Click on the edit link of attribution widget.


      Hit Remove button and you are done.

      Thanks for reading......

      Please write comments about this tutorial or tell me any faults which you found while creating and publishing. I will always there to help you...


      NUMBERED PAGE NAGIVATION HACK FOR BLOGGER


      This post explains how to add numbered page navigation widget to blogger (blogspot) blogs:

      What is Numbered Page Navigation ?


      In blogger, by default, you see Older posts, Newer Posts links near the bottom of the page which is useful to your blog visitors to navigate to other posts of your blog. But, the problem is.. people hardly notice those newer and older posts links.. which means.. less pageviews to your blog.

      So, to increase your blog pageviews you can use this cool looking, advanced numbered page navigation to your blog.


      So, how to add this to your Blogger blog ?
      (first backup your blog template before editing anything)

      1. Sign into your Blogger account » Settings » Formatting
      Choose the number of posts you want to display on homepage

      set the amount of posts to be displayed on the homepage
      2. Go to Design » Edit html » tick the expand widget templates

      Scroll down to the bottom of the template code and find this


      </body>


      PASTE this code above that line


      <b:if cond='data:blog.pageType != "item"'>
      <b:if cond='data:blog.pageType != "static_page"'>
      <script type='text/javascript'>
      var pageCount=5;
      var displayPageNum=5;
      var upPageWord ='Previous';
      var downPageWord ='Next';
      </script>

      <script type='text/javascript'>

      //<![CDATA[

      function showpageCount(json){var thisUrl=home_page_url;var htmlMap=new Array();var thisNum=1;var postNum=1;var itemCount=0;var fFlag=0;var eFlag=0;var html='';var upPageHtml='';var downPageHtml='';for(var i=0,post;post=json.feed.entry[i];i++){var timestamp1=post.published.$t.substring(0,19)+post.published.$t.substring(23,29);timestamp=encodeURIComponent(timestamp1);var title=post.title.$t;if(title!=''){if(itemCount==0||(itemCount%pageCount==(pageCount-1))){if(thisUrl.indexOf(timestamp)!=-1){thisNum=postNum}if(title!='')postNum++;htmlMap[htmlMap.length]='/search?updated-max='+timestamp+'&max-results='+pageCount}}itemCount++}for(var p=0;p<htmlMap.length;p++){if(p>=(thisNum-displayPageNum-1)&&p<(thisNum+displayPageNum)){if(fFlag==0&&p==thisNum-2){if(thisNum==2){upPageHtml='<span class="showpage"><a href="/">'+upPageWord+'</a></span>'}else{upPageHtml='<span class="showpage"><a href="'+htmlMap[p]+'">'+upPageWord+'</a></span>'}fFlag++}if(p==(thisNum-1)){html+='<span class="showpagePoint">'+thisNum+'</span>'}else{if(p==0){html+='<span class="showpageNum"><a href="/">1</a></span>'}else{html+='<span class="showpageNum"><a href="'+htmlMap[p]+'">'+(p+1)+'</a></span>'}}if(eFlag==0&&p==thisNum){downPageHtml='<span class="showpage"> <a href="'+htmlMap[p]+'">'+downPageWord+'</a></span>';eFlag++}}}if(thisNum>1){html=''+upPageHtml+' '+html+' '}html='<div class="showpageArea" style="padding:10px 10px 10px 10px;"><span style="COLOR: #000;" class="showpageOf"> Pages ('+(postNum-1)+')</span>'+html;if(thisNum<(postNum-1)){html+=downPageHtml}if(postNum==1)postNum++;html+='</div>';var pageArea=document.getElementsByName("pageArea");var blogPager=document.getElementById("blog-pager");if(postNum<=2){html=''}for(var p=0;p<pageArea.length;p++){pageArea[p].innerHTML=html}if(pageArea&&pageArea.length>0){html=''}if(blogPager){blogPager.innerHTML=html}}function showpageCount2(json){var thisUrl=home_page_url;var htmlMap=new Array();var isLablePage=thisUrl.indexOf("/search/label/")!=-1;var thisLable=isLablePage?thisUrl.substr(thisUrl.indexOf("/search/label/")+14,thisUrl.length):"";thisLable=thisLable.indexOf("?")!=-1?thisLable.substr(0,thisLable.indexOf("?")):thisLable;var thisNum=1;var postNum=1;var itemCount=0;var fFlag=0;var eFlag=0;var html='';var upPageHtml='';var downPageHtml='';var labelHtml='<span class="showpageNum"><a href="/search/label/'+thisLable+'?&max-results='+pageCount+'">';var thisUrl=home_page_url;for(var i=0,post;post=json.feed.entry[i];i++){var timestamp1=post.published.$t.substring(0,19)+post.published.$t.substring(23,29);timestamp=encodeURIComponent(timestamp1);var title=post.title.$t;if(title!=''){if(itemCount==0||(itemCount%pageCount==(pageCount-1))){if(thisUrl.indexOf(timestamp)!=-1){thisNum=postNum}if(title!='')postNum++;htmlMap[htmlMap.length]='/search/label/'+thisLable+'?updated-max='+timestamp+'&max-results='+pageCount}}itemCount++}for(var p=0;p<htmlMap.length;p++){if(p>=(thisNum-displayPageNum-1)&&p<(thisNum+displayPageNum)){if(fFlag==0&&p==thisNum-2){if(thisNum==2){upPageHtml=labelHtml+upPageWord+'</a></span>'}else{upPageHtml='<span class="showpage"><a href="'+htmlMap[p]+'">'+upPageWord+'</a></span>'}fFlag++}if(p==(thisNum-1)){html+='<span class="showpagePoint">'+thisNum+'</span>'}else{if(p==0){html=labelHtml+'1</a></span>'}else{html+='<span class="showpageNum"><a href="'+htmlMap[p]+'">'+(p+1)+'</a></span>'}}if(eFlag==0&&p==thisNum){downPageHtml='<span class="showpage"> <a href="'+htmlMap[p]+'">'+downPageWord+'</a></span>';eFlag++}}}if(thisNum>1){if(!isLablePage){html=''+upPageHtml+' '+html+' '}else{html=''+upPageHtml+' '+html+' '}}html='<div class="showpageArea"><span style="COLOR: #000;" class="showpageOf"> Pages ('+(postNum-1)+')</span>'+html;if(thisNum<(postNum-1)){html+=downPageHtml}if(postNum==1)postNum++;html+='</div>';var pageArea=document.getElementsByName("pageArea");var blogPager=document.getElementById("blog-pager");if(postNum<=2){html=''}for(var p=0;p<pageArea.length;p++){pageArea[p].innerHTML=html}if(pageArea&&pageArea.length>0){html=''}if(blogPager){blogPager.innerHTML=html}}var home_page_url=location.href;var thisUrl=home_page_url;if(thisUrl.indexOf("/search/label/")!=-1){if(thisUrl.indexOf("?updated-max")!=-1){var lblname1=thisUrl.substring(thisUrl.indexOf("/search/label/")+14,thisUrl.indexOf("?updated-max"))}else{var lblname1=thisUrl.substring(thisUrl.indexOf("/search/label/")+14,thisUrl.indexOf("?&max"))}}var home_page="/";if(thisUrl.indexOf("?q=")==-1){if(thisUrl.indexOf("/search/label/")==-1){document.write('<script src="'+home_page+'feeds/posts/summary?alt=json-in-script&callback=showpageCount&max-results=99999" ><\/script>')}else{document.write('<script src="'+home_page+'feeds/posts/full/-/'+lblname1+'?alt=json-in-script&callback=showpageCount2&max-results=99999" ><\/script>')}}

      //]]>

      </script>
      </b:if>
      </b:if>


      In that above code, Edit the part that I highlighted in red color according to Step 1. It determines the number of posts that to be displayed per page. (Make sure, the number you set is same like the one in Step 1)


      3. Control + F and search for all the occurrences of this code

      'data:label.url'


      and replace it with this


      'data:label.url + &quot;?&amp;max-results=5&quot;'


      Again, the number in the above line depends on the number you set in the STEP 1.

      4. Now, the styling part.. I've made x styles.. you can choose the one you wish..


      (i) Default


      Code


      .showpageArea a {
      text-decoration:underline;
      background: #ffffff;
      padding: 10px 10px 10px 10px;

      }
      .showpageNum a {
      text-decoration:none;
      border: 1px solid #cccccc;
      border-top: 1px solid #cccccc;
      margin:0 3px;
      padding:3px;
      }
      .showpageNum a:hover {
      border: 1px solid #cccccc;
      background-color:#cccccc;
      }
      .showpagePoint {
      color:#333;
      text-decoration:none;
      border: 1px solid #cccccc;
      background: #cccccc;
      margin:0 3px;
      padding:3px;
      }
      .showpageOf {
      text-decoration:none;
      padding:3px;
      margin: 0 3px 0 0;
      }
      .showpage a {
      text-decoration:none;
      border: 1px solid #cccccc;
      padding:3px;
      }
      .showpage a:hover {
      text-decoration:none;
      }
      .showpageNum a:link,.showpage a:link {
      text-decoration:none;
      color:#333333;
      }


      Copy the above code. Find this line and paste that code ABOVE IT.


      ]]></b:skin>


      Save the changes.

      I've made a few more navigation styles.. I'll post them in a few min.. look for it.


      ADD ANIMATED SCROLL RECENT POSTS WITH THUMBNAILS FOR BLOGGER


      Animated Scroll Recent Posts With Thumbnails For Blogger
      When people visit your blog it is important to keep them there for as long as possible, the longer someone is on your blog the more likely they will be to return and subscribe or follower.Displaying a list of your most recent posts in your sidebar is a great way to keep those visitors busy.

      There are lots of recent posts widgets and archive widgets you can use but the one we will cover in this post will defiantly grab the attention of people on your blog. This widget displays your most recent posts and includes a small thumbnail, but has the added bonus of using an animated effect that moves smoothly through the posts.


      How To Add Animated Scroll Recent Posts With Thumbnails To Blogger?

      1. Login to your Blogger account.
      2. Go to Layout > Add A Gadget.
      3. In Add A Gadget window, select HTML/Javascript.
      4. Copy the code below and Paste it inside the content box.

      <!-- Please do not remove this credit and the “Get this widget” link at the bottom of the widget. -->
      <!-- Animated Scroll Recent Posts With Thumbnails Script Start -->
      <p style="display:none;">Animated Scroll Recent Posts With Thumbnails For Blogger by <a href="http://allblogertoolsinfo.blogspot.in/">abt</a></p><script src="http://ajax.googleapis.com/ajax/libs/jquery/1.3.2/jquery.min.js" type="text/javascript"></script><style type="text/css" media="screen">
      <!--
      
      #spylist {
      
      overflow:hidden;
      
      margin-top:5px;
      
      padding:0px 0px;
      
      height:350px;
      
      }
      
      #spylist ul{
      
      width:220px;
      
      overflow:hidden;
      
      list-style-type: none;
      
      padding: 0px 0px;
      
      margin:0px 0px;
      
      }
      
      #spylist li {
      
      width:208px;
      
      padding: 5px 5px;
      
      margin:0px 0px 5px 0px;
      
      list-style-type:none;
      
      float:none;
      
      height:70px;
      
      overflow: hidden;
      
      background:#fff url(http://1.bp.blogspot.com/_AstD3fky-O0/TPqUOD822nI/AAAAAAAAALU/IqHlrBo0W6Y/s1600/bdlab-blogspot-com.jpg) repeat-x;
      
      border:1px solid #ddd;
      
      }
      
      #spylist li a {
      
      text-decoration:none;
      
      color:#4B545B;
      
      font-size:11px;
      
      height:18px;
      
      overflow:hidden;
      
      margin:0px 0px;
      
      padding:0px 0px 2px 0px;
      
      }
      
      #spylist li img {
      
      float:left;
      
      margin-right:5px;
      
      background:#EFEFEF;
      
      border:0;
      
      }
      
      .spydate{
      
      overflow:hidden;
      
      font-size:10px;
      
      color:#0284C2;
      
      padding:2px 0px;
      
      margin:1px 0px 0px 0px;
      
      height:15px;
      
      font-family:Tahoma,Arial,verdana, sans-serif;
      
      }
      
      .spycomment{
      
      overflow:hidden;
      
      font-family:Tahoma,Arial,verdana, sans-serif;
      
      font-size:10px;
      
      color:#262B2F;
      
      padding:0px 0px;
      
      margin:0px 0px;
      
      }
      
      -->
      
      </style>
      
      <script language='JavaScript'> 
      
      imgr = new Array();
      
      imgr[0] = "http://1.bp.blogspot.com/_u4gySN2ZgqE/SosvnavWq0I/AAAAAAAAArk/yL95WlyTqr0/s400/noimage.png";
      
      imgr[1] = "http://1.bp.blogspot.com/_u4gySN2ZgqE/SosvnavWq0I/AAAAAAAAArk/yL95WlyTqr0/s400/noimage.png";
      
      imgr[2] = "http://1.bp.blogspot.com/_u4gySN2ZgqE/SosvnavWq0I/AAAAAAAAArk/yL95WlyTqr0/s400/noimage.png";
      
      imgr[3] = "http://1.bp.blogspot.com/_u4gySN2ZgqE/SosvnavWq0I/AAAAAAAAArk/yL95WlyTqr0/s400/noimage.png";
      
      imgr[4] = "http://1.bp.blogspot.com/_u4gySN2ZgqE/SosvnavWq0I/AAAAAAAAArk/yL95WlyTqr0/s400/noimage.png";
      
      showRandomImg = true;
      
      boxwidth = 255;
      
      cellspacing = 6;
      
      borderColor = "#232c35";
      
      bgTD = "#000000";
      
      thumbwidth = 70;
      
      thumbheight = 70;
      
      fntsize = 12;
      
      acolor = "#666";
      
      aBold = true;
      
      icon = " ";
      
      text = "comments";
      
      showPostDate = true;
      
      summaryPost = 40;
      
      summaryFontsize = 10;
      
      summaryColor = "#666";
      
      icon2 = " ";
      
      numposts = 10;
      
      home_page = "http://allblogertoolsinfo.blogspot.in/";
      
      limitspy=4
      
      intervalspy=4000
      
      </script>
      
      <div id="spylist">
      
      <script src='http://beautifulbloggerwidgets.googlecode.com/files/animated_recent_posts.js' type='text/javascript'></script>
      
      </div>
      
      <!-- Animated Scroll Recent Posts With Thumbnails Script End -->

      5. Save
      Important : If you look in the code you will find http://allblogertoolsinfo.blogspot.in/ replace this with your blogs URL.

      Optional Changes : There are lost of changes that can be made to the code if your comfortable making changes, the main edit you may want to make is the number of posts displayed.To change the number of posts that are scrolled through change the following :

      numposts =10;

      You can change from 10 to the number of posts you wish to have displayed.

      Note: Find home_page = ""; and put your blog url like this home_page = "http://allblogertoolsinfo.blogspot.in/";

      Now you should have a working Animated Scroll Recent Posts With Thumbnails on your blog.

      Happy Blogging =) - Leave your Comments and Please Share this widget.

      Note: This widget or any other feed based widget will work only on blogs having public feeds.


    1. Home
    2. About Us
    3. Contact Us
    4. Write For Us
    5. Sitemap
    6. Privacy Policy
    7. Back To Top