Thursday, 12 September 2013

Add Sticky CSS Flocting Bar For Blogger

Add Sticky Css Floting Bar To Your Blogger Blog Which attracts more No of Visitors To Your Blog...Your Blog Look Beautiful And Greate.To Add Follow The Below Steps


1 . First Go To Blogger.com > Your Blog > Template

2 . Click On  Backup and Backup Your Template
3 . Now Click On Edit HTML

  • Search for ]]></b:skin>   (Want help to find code Click Here)
  • And Paste The Below Css Code Before/Above It  

/* NBT Notification bar */
#nbtbarWrap{
display: none;
margin: 0;
padding: 0;
position: fixed;
margin-top: -41px;
z-index: 999999;
width: 100%;
height: 41px;
}
#nbtbar {
width: 100%;
height: 28px;
margin: 0px;
padding-top: 7px;
text-align: center;
box-shadow: inset 0 1px 0 rgba(255, 255, 255, .3); -moz-box-shadow: inset 0 1px 0 rgba(255, 255, 255, .3); -webkit-box-shadow: inset 0 1px 0 rgba(255, 255, 255, .3);  background: url(https://blogger.googleusercontent.com/img/b/R29vZ2xl/AVvXsEjlajADQAGmnHDDo_VqTwW9ZzA2AaCn7jwHRfJFbvStQ4j1CbNN-PTQ8E7n0-cCV3EUlhFu3zVn0_B354A1L-VPN4DYljZSYKHF2jFM1cFu-OusXKZwjp6V9P3JNzJr3ECd5GybZGSFJQyB/s1600/nbtbarback.png);
position: relative;
box-shadow: 1px 2px 9px #666666;
z-index: 9998;
text-decoration: none;
color: #eeeeee;
font-family: arial,sans-serif;
font-size: 13px;
font-weight: bold;
text-shadow: 1px 1px 4px rgb(0, 0, 0);
border-bottom: 2px solid #cccccc;
}
#nbtbar a{
text-decoration: none;
color: #fff;
font-family: arial,sans-serif;
font-size: 13px;
font-weight: bold;
text-shadow: 1px 1px 1px #000;
outline: none;
}
#nbtbar a:hover{
text-decoration: underline;
}
#nbtbarWrap #closenbtbar{
display: block;
position: absolute;
top: 0;
right: 23px;
height: 40px;
width: 21px;
background: url(https://blogger.googleusercontent.com/img/b/R29vZ2xl/AVvXsEhu84qInAc0RFTTmyv8RlzMLGmw9RmJsddbGAI1Fv1mWdBRkjbzyuFHerXiwGd182VOPND7u28H3djKJxFZoOgsusgyPdatF9O-2kOYaIFrNJFz1ub8vHV564JZnwRYxjrbjXxSemWGXARy/s1600/NBT-light.png) no-repeat 0 center;
cursor: pointer;
}
#nbtbarWrap #closenbtbar:hover{
background-position: -21px 50%;
}
#nbtbarWrap.bottomPosition #closenbtbar{
background-position: right 50%;
}
#nbtbarWrap.bottomPosition #closenbtbar:hover{
background-position: -42px 50%;
}
#nbtbarWrap #opennbtbar{
display: block;
position: absolute;
top: -6px;
right: 15px;
padding: 0 7px;
box-shadow: inset 0 1px 0 rgba(255, 255, 255, .3); -moz-box-shadow: inset 0 1px 0 rgba(255, 255, 255, .3); -webkit-box-shadow: inset 0 1px 0 rgba(255, 255, 255, .3);  background: url(https://blogger.googleusercontent.com/img/b/R29vZ2xl/AVvXsEjlajADQAGmnHDDo_VqTwW9ZzA2AaCn7jwHRfJFbvStQ4j1CbNN-PTQ8E7n0-cCV3EUlhFu3zVn0_B354A1L-VPN4DYljZSYKHF2jFM1cFu-OusXKZwjp6V9P3JNzJr3ECd5GybZGSFJQyB/s1600/nbtbarback.png);
border-left: 2px solid #dddddd;
border-right: 2px solid #dddddd;
border-bottom: 2px solid #dddddd;
cursor: pointer;
z-index: 1;
-webkit-border-bottom-right-radius: 5px;
-webkit-border-bottom-left-radius: 5px;
-moz-border-radius-bottomright: 5px;
-moz-border-radius-bottomleft: 5px;
border-bottom-right-radius: 5px;
border-bottom-left-radius: 5px;
box-shadow: 1px 2px 9px #333333;
}
#nbtbarWrap #opennbtbar span{
display: block;
width: 21px;
height: 34px;
background: url(https://blogger.googleusercontent.com/img/b/R29vZ2xl/AVvXsEhu84qInAc0RFTTmyv8RlzMLGmw9RmJsddbGAI1Fv1mWdBRkjbzyuFHerXiwGd182VOPND7u28H3djKJxFZoOgsusgyPdatF9O-2kOYaIFrNJFz1ub8vHV564JZnwRYxjrbjXxSemWGXARy/s1600/NBT-light.png) no-repeat right 50%;
}

Now ADD The Below Code After The <body>  or <body

<div class='opennbtbar' id='nbtbarWrap' style='display: block; margin-top: 0px;'>
<div id='nbtbar'>
<strong><font color='#84DC04'>Trending: </font></strong><a href='http://newblogger-tricks.blogspot.in/2013/09/add-sticky-css-floating-bar-for-blogger.html'>Get This Notification Bar!</a> |
    <strong><font color='#FFFF00'>Most Popular: </font></strong><a href='http://newblogger-tricks.blogspot.in/2013/09/how-to-remove-powered-by-blogger.html'>Remove "powered by blogger" Attribution!</a>
<span id='closenbtbar'/></div><span id='opennbtbar' style='top: -6px;'><span/></span></div> <br/> <br/>
  • Replace   ULR's  With Your Ulr Of The Post
  •   Replace Get This Widget , Remove "powered by blogger" Attribution  with Your Post Title
Now Finally Add This Code Below/After <head> Imp

<script src='http://ajax.googleapis.com/ajax/libs/jquery/1/jquery.min.js' type='text/javascript'/>

<script src='https://newbloggertricks.googlecode.com/svn/NBT-notificationBar.js' type='text/javascript'/>

    Go To Your Blog And Check The Widget


    Note: This widget is created by NewBloggerTricks. Don't forgot to link back if you want to share this tutorial


    Wednesday, 11 September 2013

    Mashable Sharing Widget For Blogger

    This is The New Version Of The Mashable Sharing Widget For Blogger You Can Add It To Your Blog By
    Following Below Steps :
    First Go To Layout Tab And Select Add a Widget
    Then select HTML/JavaScript And Paste  The Below Code Inside It


     <style>
        /* Social Widget */
        #NBT-mashable-bar {
            border: 0;
            margin-bottom: 10px;
            margin: 0 auto;
                width:300px;
        }
        .fb-likebox {
            background: #fff;
            padding: 10px 13px 0 10px;
            border-right: 1px solid #D8E6EB;
           border-left: 1px solid #D8E6EB;
           border-bottom: 1px solid #D8E6EB;
            margin:0px;
                height:45px;
        }
        .googleplus {
            background: #F5FCFE;
            border-top: 1px solid #FFF;
            border-bottom: 1px solid #ebebeb;
            border-right: 1px solid #D8E6EB;
            border-left: 1px solid #D8E6EB;
            border-image: initial;
            font-size: .90em;
            font-family: "Arial","Helvetica",sans-serif;
            color: #000;
            padding: 9px 11px;
            line-height: 1px;}
        .googleplus span {
            color: #000;
            font-size: 11px;
            position: absolute;
            display:inline-block;
            margin: 9px 70px;}
        .g-plusone {    float: left;}
    .gplus {
            background: #fff;
            padding: 0px;
            border: 0px solid #C7DBE2;
            margin-bottom:-13px;}

        .twitter {
            background: #EEF9FD;
            padding: 10px;
            border: 1px solid #C7DBE2;
            border-top: 0;}
        #mashable {
            background: #EBEBEB;
            border: 1px solid #CCC;
            border-top: 1px solid white;
            padding: 2px 8px 2px 3px;
            text-align: right;
            border-image: initial;}
        #mashable .author-credit {}
        #mashable .author-credit a {
            font-size: 10px;
            font-weight: bold;
            text-shadow: 1px 1px white;
            color: #1E598E;
            text-decoration:none;}
        #email-news-subscribe .email-box{
            padding: 5px 10px;
            font-family: "Arial","Helvetica",sans-serif;
            border-top: 0;
            border-right: 1px solid #C7DBE2;
            border-left: 1px solid #C7DBE2;
            border-image: initial;
           height:35px;}
        #email-news-subscribe .email-box input.email{
            background:#FFFFFF;
            border: 1px solid #dedede;
            color: #999;
            padding: 7px 10px 8px 10px;
            -moz-border-radius: 3px;
            -webkit-border-radius: 3px;
            -o-border-radius: 3px;
            -ms-border-radius: 3px;
            -khtml-border-radius: 3px;
            border-radius: 3px;
            border-image: initial;
            font-family: "Arial","Helvetica",sans-serif;}
        #email-news-subscribe .email-box input.email:focus{color:#333}
        #email-news-subscribe .email-box input.subscribe{
            background: -moz-linear-gradient(center top,#FFCA00 0,#FF9B00 100%);
            background: -webkit-gradient(linear,left top,left bottom,color-stop(0,#FFCA00),color-stop(1,#FF9B00));
            background: -moz-linear-gradient(center top,#FFCA00 0,#FF9B00 100%);
            -pie-background: linear-gradient(270deg,#ffca00,#ff9b00);
            font-family: "Arial","Helvetica",sans-serif;
            border-radius:3px;
            -moz-border-radius:3px;
            -webkit-border-radius:3px;
            border:1px solid #cc7c00;
            color:white;
            text-shadow:#d08d00 1px 1px 0;
            padding:7px 14px;
            margin-left:3px;
            font-weight:bold;
            font-size:12px;
            cursor:pointer;
            border-image: initial;}
        #email-news-subscribe .email-box input.subscribe:hover{
            background: #ff9b00;
            background-image:-moz-linear-gradient(top,#ffda4d,#ff9b00);
            background-image:-webkit-gradient(linear,left top,left bottom,from(#ffda4d),to(#ff9b00));
            filter:progid:DXImageTransform.Microsoft.Gradient(startColorStr=#ffffff,endColorStr=#ebebeb);
            outline:0;-moz-box-shadow:0 0 3px #999;
            -webkit-box-shadow:0 0 3px #999;
            box-shadow:0 0 3px #999
            background:-webkit-gradient(linear,left top,left bottom,color-stop(0,#ffda4d),color-stop(1,#ff9b00));
            background:-moz-linear-gradient(center top,#ffda4d 0,#ff9b00 100%);
            -pie-background:linear-gradient(270deg,#ffda4d,#ff9b00);
            border-radius:3px;
            -moz-border-radius:3px;
            -webkit-border-radius:3px;
            border:1px solid #cc7c00;
            color:#FFFFFF;
            text-shadow:#d08d00 1px 1px 0}
        #other-social-bar {
            background-color: #D8E6EB;
            box-shadow: 0 1px 1px #FFFFFF inset;
            padding: 0px;
            font-family: "Arial","Helvetica",sans-serif;
            font-weight:bold;
            overflow: hidden;
            border: 1px solid #B6D0DA;
               height:37px;
        }
        #other-social-bar ul {list-style: none outside none; padding-left: 4px;}
        #other-social-bar .other-follow {
            float: left;
            color:#1E598E;
            overflow: hidden;
            height:20px;
            padding:5px;
            width: 270px;}
        #other-social-bar .other-follow ul {
            list-style: none outside none;
            padding-left: 4px;}
        #other-social-bar .other-follow ul li {
            font-size: 12px;
            font-weight: bold;
            display:inline;
            border:0;
            text-shadow: 1px 1px white;}
        #other-social-bar .other-follow ul li a {
            font-size: 12px;
            color:#1E598E;
            font-weight: bold;
            display:inline;
            text-shadow: 1px 1px white;}
        #other-social-bar .other-follow li {
            font-size: 12px;
            font-weight: bold;
            display:inline;
            border:0;
            text-shadow: 1px 1px white;}
        #other-social-bar .other-follow li a {
            font-size: 12px;
            color:#1E598E;
            font-weight: bold;
            display:inline;
            text-shadow: 1px 1px white;}
        #other-social-bar .other-follow li.my-rss {
            background: url('https://blogger.googleusercontent.com/img/b/R29vZ2xl/AVvXsEiEGfCwv2AWo3SAb4dAaBBSL_ij_wvsHgbE1tbM7i3ZvUOahH-crb7F1yBVxuGoFqirvrI81E11PEJMkCMceQ7OvDrps_zQERyjZs4Cm_jzaUEZQJRE4PGcdMrc-hoKqBwIEaT_OFSPAZM/s400/rss-16x16.png') no-repeat transparent;
            line-height: 1;
            padding: 0px 3px 1px 20px;
            width: 60px;
            margin-bottom:0px;
                margin-left:5px;}
        #other-social-bar .other-follow li.my-rss a, #other-social-bar .other-follow li.my-twitter a, #other-social-bar .other-follow li.my-gplus a{
        text-decoration:none;
        }
        #other-social-bar .other-follow li.my-rss a:hover, #other-social-bar .other-follow li.my-twitter a:hover, #other-social-bar .other-follow li.my-gplus a:hover{
        text-decoration:underline;
        }
        #other-social-bar .other-follow li.my-twitter {
            background: url('https://blogger.googleusercontent.com/img/b/R29vZ2xl/AVvXsEiSPE7_-jQBSbSDPHarpa_niCFVVSGMSJKV36M29Uof5vICaccBuJWxYlowiuT7Gz2Tfaed6CRZqVBJ8uVyxCW6ni35ft3OM1eE_4eC5SzYXT3tvDx2uhwh5lfnDYh6glvD11_ezBUHz9w/s400/twitter%2527.png') no-repeat transparent;
            line-height: 1;
            padding: 0px 3px 1px 20px;
            width: 60px;
            margin-bottom:0px;}
        #other-social-bar .other-follow li.my-gplus {
            background: url(https://blogger.googleusercontent.com/img/b/R29vZ2xl/AVvXsEgyy3zjUmuSnjG38MDIqjLRcfzNT_r3jg4jUf2VRSLO-WJwfdIoi4Is8_l09mcig8p7y_M-KLHAllof0X3NDr_Q2O174wq5Md-A5KyC8qOrdrxL74me0DfLB-H8ad7q4pxHgW3FbiLx1-c/s400/gplus-16x16.png) no-repeat transparent;
            line-height: 1;
            width: 60px;
            padding: 0px 3px 1px 20px;
            margin-bottom:0px;}

        </style>

        <!--[if IE]>
        <style>
        #email-news-subscribe .email-box input.subscribe{
            background: #FFCA00;
            }
        </style>
        <![endif]-->
    <!--begin of social widget-->   <div style="margin-bottom:10px;"> <div id="NBT-mashable-bar" > <!-- Begin Widget -->
    <div class="gplus"> <link href="https://plus.google.com/b/102277746227708746526" rel="publisher" />
    <script type="text/javascript"> window.___gcfg = {lang: 'en'}; undefinedfunctionundefined) {var po = document.createElementundefined"script"); po.type = "text/javascript"; po.async = true;po.src = "https://apis.google.com/js/plusone.js"; var s = document.getElementsByTagNameundefined"script")[0]; s.parentNode.insertBeforeundefinedpo, s); })undefined);</script> <script type="text/javascript"> var _gaq = _gaq || []; _gaq.pushundefined['_setAccount', 'UA-29131740-1']); _gaq.pushundefined['_trackPageview']); undefinedfunctionundefined) { var ga = document.createElementundefined'script'); ga.type = 'text/javascript'; ga.async = true; ga.src = undefined'https:' == document.location.protocol ? 'https://ssl' : 'http://www') + '.google-analytics.com/ga.js'; var s = document.getElementsByTagNameundefined'script')[0]; s.parentNode.insertBeforeundefinedga, s); })undefined); </script>
    <!-- Place this tag where you want the badge to render --> <g:plus href="https://plus.google.com/b/102277746227708746526" width="300" height="131" margin="0px" theme="light"></g:plus> </div>
    <div class="fb-likebox"> <!-- Facebook --> <iframe src="//www.facebook.com/plugins/like.php?href=http://facebook.com/newbloggertricks&amp;send=false&amp;layout=standard&amp; width=200px&amp;show_faces=false&amp;action=like&amp;colorscheme=light&amp; font&amp;height=100px&amp;" scrolling="no" frameborder="0" style="border:none; overflow:hidden; "></iframe> </div>
    <div class="googleplus"> <!-- Google --> <span>Recommend us on Google!</span><div class="g-plusone" data-size="medium"></div> <script type="text/javascript" src="https://apis.google.com/js/plusone.js"></script> </div>
    <div class="twitter"> <!-- Twitter --> <iframe title="" style="width: 300px; height: 20px;" class="twitter-follow-button" src="http://platform.twitter.com/widgets/follow_button.html#_=1319978796351&amp; align=&amp;button=blue&amp;id=twitter_tweet_button_0&amp; lang=en&amp;link_color=&amp;screen_name=newbloggertrix&amp;show_count=&amp; show_screen_name=&amp;text_color=" frameborder="0" scrolling="no"></iframe> </div>
    <div id="email-news-subscribe"> <!-- Email Subscribe --> <div class="email-box"> <form action="http://feedburner.google.com/fb/a/mailverify" method="post" target="popupwindow" onsubmit="window.openundefined'http://feedburner.google.com/fb/a/mailverify?uri=Technofusion1', 'popupwindow', 'scrollbars=yes,width=550,height=520');return true"> <input class="email" type="text" style="width: 150px; font-size: 12px;" id="email" name="email" value="Enter Your Email here.." onfocus="ifundefinedthis.value==this.defaultValue)this.value=&#39;&#39;;" onblur="ifundefinedthis.value==&#39;&#39;)this.value=this.defaultValue;" /> <input type="hidden" value="tntbystc" name="uri" /> <input type="hidden" name="loc" value="en_US" /> <input class="subscribe" name="commit" type="submit" value="Subscribe" /> </form> </div> </div> <div id="other-social-bar"> <!-- Other Social Bar --> <ul class="other-follow"> <li class="my-rss"> <a rel="nofollow" title="RSS" href="http://feeds.feedburner.com/Technofusion1" target="_blank">RSS Feed</a> </li> <li class="my-twitter"> <a rel="nofollow" title="twitter" rel="author" href=http://twitter.com/newbloggertrix"  target="_blank">Twitter</a> </li> <li class="my-gplus"> <a rel="nofollow" title="Google Plus" rel="author" href=https://plus.google.com/b/102277746227708746526 target="_blank">Google Plus</a> </li> </ul> </div> <div id="mashable" style="background: #EBEBEB;border: 1px solid #CCC;border-top: 1px solid white;padding: 1px 8px 1px 3px;text-align: right;border-image: initial;font-size:10px;font-family: "arial","helvetica",sans-serif;"> <span class="author-credit" style="font-family: Arial, Helvetica, sans-serif;"><a href="http://newblogger-tricks.blogspot.in/2013/09/mashable-sharing-widget-for-blogger.html" target="_blank" >NBT Widgets »</a></span></div></div> <!-- End Widget --> </div><!--end of social widget--> 


    • Replace All (3) https://plus.google.com/b/102277746227708746526 With Your GooglePlus Profile
    • Replace All (2) newbloggertrix With Your Twitter Profile Name
    • Replace All (2) Technofusion1 With Your Feed Burner Account Name
    • Replace newbloggertricks With Your FaceBook User ID

    Next search for this ]]></b:skin> Paste the following code just below or after it

    <script src='http://apis.google.com/js/plusone.js' type='text/javascript'/>

    Now save your widget and you are all done! Go And Check Your Blog


    How To Remove "POWERED BY BLOGGER" Attribution Gadget ?

    We all know that Blogger is a Great Platform where we can Show Our Influence of designing.
    The attribution gadget at footer of blog and says "Powered by Blogger".

    The gadget is locked,when you click on the edit link of attribution gadget you will notice that there is no Remove link,Because the gadget is locked officially by the blogger.If You Want To unlock the gadget follow my below easy steps carefully.


    How To Remove Blogger Attribution Gadget


    Go to Blogger Dashboard > Design > Edit HTML.(In new User Interference it is Dashboard > Template) 
    As always download a copy of your template


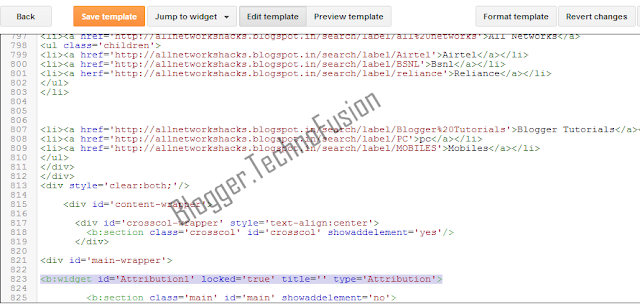
    Now search for below code in your template


    <b:widget id='Attribution1' locked='true' title='' type='Attribution'>


    Replace
    locked='true'


    with
    locked='false'


    as shown below


    Now save your template and go to Layout page. Click on the edit link of attribution widget.


    Hit Remove button and you are done.

    Thanks for reading......

    Please write comments about this tutorial or tell me any faults which you found while creating and publishing. I will always there to help you...


    Create A Grab Our Button/Badge Widget And Add It To Blogger/Blogspot


    Grab our button/badge is a most amazing way to promote your blog via other blogs,Your blog fans or users
    can easily add this on their blog.


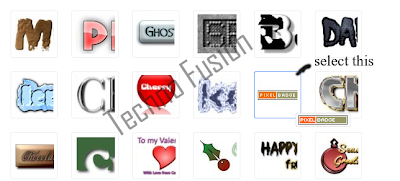
    Go to Cooltext (Follow the image instructions below )

    2. Select PIXEL BADGE. And follow the image instructions below.


    After Selecting Pixel Badge The Shown Below Is Appear


    3. After you customize all windows hit Create LOGO button at bottom left and  download the image.

    4. Upload it and get URL of the downloaded image like .png or .jpg

    Code No. 1

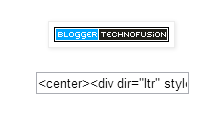
    <center><div dir="ltr" style="text-align: center;" trbidi="on"> <a href="Blog URL"><img alt="" src="IMAGE URL" title="Title On Mouse Hovering" /></a></div></center>


    Replace Blog URL with your blog address.
    Replace IMAGE URL with your uploaded badge url.
    Replace Title On Mouse Hovering with Title which you want on mouse hovering.

    How To Add It On Your Blog - Carefully Add It.....


    Copy above code after customizing and paste it in Notepad (important)
    Encode copied code using HTML Code Encoder.
    Now Careful.....

    Code No.2

    <center> <input type="text" onclick="this.focusundefined);this.selectundefined)" readonly value="Paste Encoded Code Here" /> </center>


    Replace Paste Encoded Code Here with encoded code.

    Now go to Blogger Dashboard > Design
    Then select Add a Gadget > HTML/JavaScript.
    Copy and paste code no.1 just below that paste code no.2 and give title like Grab Our Button 

    Now save your changes and refresh your blog to see changes.


    Please write comments about this tutorial or tell me any faults which you found while creating and publishing. I will always there to help you....


    Beautiful Popular Posts Widget v.1


    Popular posts widget is an effective tool to increase your blog pageviews and engage readers more on your
    blog. It fetches and ranks posts based on most visited pages using your Google analytics data.


    Add Popular Posts Widget
    Go to Blogger > Layout
    Click "Add a Gadget"
    Choose "Popular Posts" from the list
    You will need to configure its settings as shown in the image below: uncheck "image thumbnail" and also "snippet" Its better that you display at most 6-8 posts. Less is good and clean.


    5. Save it


    Customize Popular Posts Plugin

    Now you need to change the default styles and change its look to our desired design using Custom styles.
    Go To Blogger > Template
    Backup your Template
    Click Edit HTML
    Search for </b:skin>. Click the black arrow to expand the code.


    5. Paste the following Styles just above </b:skin>
    /*--- TechnoFusion Popular Posts --- */
    .popular-posts ul {
    padding-left: 0px;
    counter-reset: popcount;
    }

    .popular-posts ul li:before {
    list-style-type: none;
    margin-right: 15px;
    padding: 0.3em 0.6em;
    counter-increment: popcount;
    content: counter(popcount);
    font-size: 16px;
    background: #292D30;
    color: #ffffff;
    position: relative;
    font-weight: bold;
    font-family: georgia;
    float: left;
    border: 2px solid #dddddd;
    box-shadow: 1px 2px 9px #666666; }

    .popular-posts ul li {
    border-bottom: 1px dashed #dddddd;
    }

    .popular-posts ul li:hover {
    border-bottom: 1px dashed #696969;
    }

    .popular-posts ul li a {
    text-decoration:none; color:#5A5F63;
    }


    .popular-posts ul li a:hover {
    text-decoration:none;

    }

    Customization:
    To change the background color of the Square bubble edit #292D30
    To change the text color of the bubble edit #ffffff
    By default the shape of the bubble is Square. To change it to Circle simply add the following code just after box-shadow: 1px 2px 9px #666666;


    border-radius:15px;


    6. Save your template and you are all done!

    Visit your blog to see it working just perfectly.

    Please write comments about this tutorial or tell me any faults which you found while creating and publishing. I will always there to help you....


  • Home
  • About Us
  • Contact Us
  • Write For Us
  • Sitemap
  • Privacy Policy
  • Back To Top