Saturday, 21 September 2013

Add Email Subscription Widget With Social Media Below Blogger Posts v.1

 Email Subscription Widget With Social Media Below Blogger Posts Increases Your User Subscriptions To Feed Burner, Twitter, Facebook and stumbleupon

Subscription Widget With Social Media Widget Generator


  • In Customize Field Enter The All The User Names In Corresponding Boxes
  • Click on Generate Button 
  • You Can Watch Demo (In New Tab) By Clicking on Demo
  • Copy The Generated Code And Follow Below Steps


Copy The Generated Code And Follow below Steps
  • First go to Blogger Dashboard > Template
  • Download a copy of your template
  • Click on Edit HTML
  • Find below code in your template   (Want help to find code Click Here)
<data:post.body/>

  • If You Find 3 <data:post.body/> Then Add The Code After or Below 2nd One


Finally save your template and visit your any post you will watch this widget after posts ends.I have kept the installation one step installation,if still you are getting any single problem then feel free to mention it via comments,I will reply as soon as possible.

< href="javascript:expandcollapse('subtopicID')">Direct Mode :
    How To Add Email Subscription Widget With Social Media Below Blogger Posts v.1?

<style>
#nbt-subs-box {
background: #F1F1F1;
margin: 0 auto;
padding: 10px;
border: none;
border-radius: 10px;
width:350px;
height:270px;
}
#nbt-subs-box h2 {
font-size: 27px!important;
text-align:center;
font-style: italic;
font-variant: small-caps;
}
#nbt-subs-box h3 {
font-size: 15px;
font-family: arial, sans-serif;
text-align:center;
font-style: italic;
font-variant: small-caps;
}
#nbt-subs-box div.row {
text-align:center;
margin-bottom:10px;
}
#nbt-subs-box img{
display:inline-block;
border:none;
}
#nbt-subs-box .email {
clear:none;
}
.email {
clear: both;
width: 100%;
margin: 10px 0;
}
.emailform {
position: relative;
width: 300px;
background:#FFF;
margin: 0 auto;
-webkit-box-shadow: 1px 1px 2px #dfdfdf;
-moz-box-shadow: 1px 1px 2px #dfdfdf;
box-shadow: 1px 1px 2px #dfdfdf;
-webkit-border-radius: 4px;
-moz-border-radius: 4px;
border-radius: 4px;
border: 1px solid #ddd;
}


.emailinput {

height:30px;
margin: 0 auto;
padding: 8px 40px 8px 10px;
border:none;
background: none;
font-family: georgia;
font-style: italic;
font-size: 16px;
color: #666;
}
.emailinput {
padding-right: 30px !important;
width: 260px !important;
}
.emailbutton {
-webkit-border-top-right-radius: 4px;
-webkit-border-bottom-right-radius: 4px;
-moz-border-radius-top-right: 4px;
-moz-border-radius-bottom-right: 4px;
border-top-right-radius: 4px;
border-bottom-right-radius: 4px;
-webkit-border-top-left-radius: 0px;
-webkit-border-bottom-left-radius: 0px;
-moz-border-radius-top-left: 0px;
-moz-border-radius-bottom-left: 0px;
border-top-left-radius: 0px;
border-bottom-left-radius: 0px;
padding: 9px;
position: absolute;
right: -3px;
top: -1px;
bottom: -1px;
display:block;
line-height:16px;
}
.emailbutton {
padding: 14px !important;
}

.emailbutton, .formbutton {

background: #f7f8f9;
background: -webkit-linear-gradient(top, #f7f8f9 0%, #e9e9e9 100%);
background: -moz-linear-gradient(top, #f7f8f9 0%, #e9e9e9 100%);
background: -o-linear-gradient(top, #f7f8f9 0%, #e9e9e9 100%);
background: -ms-linear-gradient(top, #f7f8f9 0%, #e9e9e9 100%);
background: linear-gradient(top, #f7f8f9 0%, #e9e9e9 100%);
filter: progid:DXImageTransform.Microsoft.gradient( startColorstr="#f7f8f9",
endColorstr="#e9e9e9",GradientType=0 );
border: 1px solid #ddd;
-webkit-border-radius: 4px;
-moz-border-radius: 4px;
border-radius: 4px;
padding: 6px 12px;
margin:0;
-webkit-box-shadow: 0 1px 0 #f9f9f9 inset, 1px 1px 1px rgba(223,223,223,0.4);
-moz-box-shadow: 0 1px 0 #f9f9f9 inset, 1px 1px 1px rgba(223,223,223,0.4);
box-shadow: 0 1px 0 #f9f9f9 inset, 1px 1px 1px rgba(223,223,223,0.4);
color: #888 !important;
text-shadow: 0 1px 0 #fff;
line-height: 1.2;
cursor: pointer;
font-size: 13px;
font-weight: bold;
text-decoration: none !important;
}
.emailbutton:hover, .formbutton:hover {
background: #f1f1f1;
background: -webkit-linear-gradient(top, #f1f1f1 0%, #e0e0e0 100%);
background: -moz-linear-gradient(top, #f1f1f1 0%, #e0e0e0 100%);
background: -o-linear-gradient(top, #f1f1f1 0%, #e0e0e0 100%);
background: -ms-linear-gradient(top, #f1f1f1 0%, #e0e0e0 100%);
background: linear-gradient(top, #f1f1f1 0%, #e0e0e0 100%);
filter: progid:DXImageTransform.Microsoft.gradient( startColorstr="#f1f1f1",
endColorstr="#e0e0e0",GradientType=0 );
text-decoration:none !important;
}
</style>


<div id='nbt-subs-box'>

<h2>Do you Like this Article</h2>
<div class='row'>
<div class='fb-like' data-href='http://www.facebook.com/newbloggertricks' data-send='true' data-width='300' data-show-faces='false'></div>
</div>
<div class='row'>
<a href="http://feeds.feedburner.com/newblogger-tricks" title="Suscribe to RSS feed"><img class='middle' src="https://blogger.googleusercontent.com/img/b/R29vZ2xl/AVvXsEjDDoNUOZ4Kk5CfDwXjpW4QEz1ml7U9DoIU1THd7oDsW5abZZJHeMIOm8T5nc9F-trFxYoSP-M5QtrJYB1xeSam15ziWcJP8H0ZBHcZkLoi87dLxEgYa_mGTlkVFHilRU0_SSr3f6yfw_h1/s1600/nbt-RSS.png" alt='rss'/></a>
<a href="http://twitter.com/newbloggertrix" title="Follow me on Twitter"><img class='middle' src="https://blogger.googleusercontent.com/img/b/R29vZ2xl/AVvXsEhuDo7K0qQdWA4mbUKgg26rKNzLw1IwDzWHIQW1TbIKp4fbUYlaLp0kP9Rv6ha_VMW48bcuvs2BiXHGF9_wlOrQ26gzPPUPAlHkfRseo-I6EpFY8q4-hP2hnkjmL1Y44eoNpfWpiGVzIulI/s1600/nbt-Twitter.png" alt='twitter'/></a>
<a href="http://www.facebook.com/newbloggertricks" title="Became Fan on Facebook"><img class='middle' src="https://blogger.googleusercontent.com/img/b/R29vZ2xl/AVvXsEg5JpiriDeKyf7-h2Waw-wTwkUXwbcrGHGJ_UEhIBcyUXA75pNfjaTVt4vSCR_qwGmdczRXxnQ-zK3p1VZssB-kFfv1Jnk8gPkepaCa9Nxnaq7K6YQpsgEqe4gugQs6kjJLJILQTuGyglw8/s1600/nbt-FaceBook.png"/></a>
<a href="http://www.stumbleupon.com/stumbler/gsrdatta/"><img src="https://blogger.googleusercontent.com/img/b/R29vZ2xl/AVvXsEjeA7YLPaT7D_okhiBqmjMI_BBEYaVEvCb-ZBR80ZMnEeardxLjX2ACEC1QeiNw2SvcnZnwBdPrJhQdan8UquJza57oZoi-g3toZ-R69wbuYF57qkOpy7fWHLMfiNzEu03VtjMILM4hHkGd/s1600/nbt-Stumbled.png" alt='stumbleupon'/></a>
</div>
<div class='row'>
<h3>Get Subscribe to Free Email Updates!!</h3>
</div>
<div class='row'>
<div class='email'>
<form action='http://feedburner.google.com/fb/a/mailverify' method='post' target='popupwindow' onsubmit='window.open("http://feedburner.google.com/fb/a/mailverify?uri=newblogger-tricks", "popupwindow", "scrollbars=yes,width=550,height=520");return true' class='emailform'>
<input type='hidden' value='newblogger-tricks' name='uri' />
<input type='hidden' name='loc' value='en_US' />
<input type='text' onblur='if (this.value == &quot;&quot;) {this.value = &quot;Enter your email...&quot;;}' onfocus='if (this.value == &quot;Enter your email...&quot;) {this.value = &quot;&quot;}' value='Enter your email...' name='email' class='emailinput' />
<input type='submit' class='emailbutton' value='SignUp' title=""/>
</form>
</div>
</div></div>


  • Replace all(three) newblogger-tricks with your Feedburner Username
  • Replace all(two)  newbloggertricks with your Facebook Username
  • Replace  newbloggertrix with your Twitter Username
  • Replace gsrdatta with your stumbleupon username

Finally save your template and visit your any post you will watch this widget after posts ends.I have kept the installation one step installation,if still you are getting any single problem then feel free to mention it via comments,I will reply as soon as possible.


Add Rainbow Animation To Links For Your Blogger Blog

This is a simple Blogger Blog Trick,Changing the color of Link when Mouse over it.7 colors are changing like animation when hover the link.
Hover On Any Link To See on demo site


Follow the simple steps below..
  • Sign in To Your Blogger Account and Select Blog That You Want To ADD This Widget then goto
  • Template Tab >> Edit HTML
  • Then Add The Below Code Above or Before </head>  (Want help to find Click Here)
<script type='text/javascript'>//<![CDATA[var rate = 20;if (document.getElementById)window.onerror=new Function("return true")var objActive;  // The object which event occured invar act = 0;    // Flag during the actionvar elmH = 0;   // Huevar elmS = 128; // Saturationvar elmV = 255; // Valuevar clrOrg;     // A color before the changevar TimerID;    // Timer IDif (document.all) {document.onmouseover = doRainbowAnchor;document.onmouseout = stopRainbowAnchor;}else if (document.getElementById) {document.captureEvents(Event.MOUSEOVER | Event.MOUSEOUT);document.onmouseover = Mozilla_doRainbowAnchor;document.onmouseout = Mozilla_stopRainbowAnchor;}function doRainbow(obj){if (act == 0) {act = 1;if (obj)objActive = obj;elseobjActive = event.srcElement;clrOrg = objActive.style.color;TimerID = setInterval("ChangeColor()",100);}}function stopRainbow(){if (act) {objActive.style.color = clrOrg;clearInterval(TimerID);act = 0;}}function doRainbowAnchor(){if (act == 0) {var obj = event.srcElement;while (obj.tagName != 'A' && obj.tagName != 'BODY') {obj = obj.parentElement;if (obj.tagName == 'A' || obj.tagName == 'BODY')break;}if (obj.tagName == 'A' && obj.href != '') {objActive = obj;act = 1;clrOrg = objActive.style.color;TimerID = setInterval("ChangeColor()",100);}}}function stopRainbowAnchor(){if (act) {if (objActive.tagName == 'A') {objActive.style.color = clrOrg;clearInterval(TimerID);act = 0;}}}function Mozilla_doRainbowAnchor(e){if (act == 0) {obj = e.target;while (obj.nodeName != 'A' && obj.nodeName != 'BODY') {obj = obj.parentNode;if (obj.nodeName == 'A' || obj.nodeName == 'BODY')break;}if (obj.nodeName == 'A' && obj.href != '') {objActive = obj;act = 1;clrOrg = obj.style.color;TimerID = setInterval("ChangeColor()",100);}}}function Mozilla_stopRainbowAnchor(e){if (act) {if (objActive.nodeName == 'A') {objActive.style.color = clrOrg;clearInterval(TimerID);act = 0;}}}function ChangeColor(){objActive.style.color = makeColor();}function makeColor(){// Don't you think Color Gamut to look like Rainbow?// HSVtoRGBif (elmS == 0) {elmR = elmV;    elmG = elmV;    elmB = elmV;}else {t1 = elmV;t2 = (255 - elmS) * elmV / 255;t3 = elmH % 60;t3 = (t1 - t2) * t3 / 60;if (elmH < 60) {elmR = t1;  elmB = t2;  elmG = t2 + t3;}else if (elmH < 120) {elmG = t1;  elmB = t2;  elmR = t1 - t3;}else if (elmH < 180) {elmG = t1;  elmR = t2;  elmB = t2 + t3;}else if (elmH < 240) {elmB = t1;  elmR = t2;  elmG = t1 - t3;}else if (elmH < 300) {elmB = t1;  elmG = t2;  elmR = t2 + t3;}else if (elmH < 360) {elmR = t1;  elmG = t2;  elmB = t1 - t3;}else {elmR = 0;   elmG = 0;   elmB = 0;}}elmR = Math.floor(elmR).toString(16);elmG = Math.floor(elmG).toString(16);elmB = Math.floor(elmB).toString(16);if (elmR.length == 1)    elmR = "0" + elmR;if (elmG.length == 1)    elmG = "0" + elmG;if (elmB.length == 1)    elmB = "0" + elmB;elmH = elmH + rate;if (elmH >= 360)elmH = 0;return '#' + elmR + elmG + elmB;}//]]></script>


  • Save Your Template After Adding Code
Thanks For Reading This Article.If You Found Any Errors In My Post Please Feel Free To Comment Below


How to Change Text Select Highlight Color on Blogger Blog

You Can easily Change Text Select Highlight Colour By Adding A Small Css Code To Your Blogger Template..This can ensure that when users highlight text on your blog, it matches your blog’s theme, and may also look professional at the same time.


Follow These Simple Steps :

  • Sign in To Your Blogger Account and Select Blog That You Want To ADD This Widget then goto
  • Template Tab >> Edit HTML
  • Then Add The Below Code Below or After </head> (Want help to find Click Here)
<style type='text/css'>
 ::selection {background:#00624b;color:#ffffff;}
 ::-moz-selection{background:#00624b;color:#ffffff;}
</style>

  • Then Save Your Template
  • You Can Change The Selecting Colour By Replacing #00624b with Code Of Your Colour
Try Our Html Colour Code Generator Nbt Colour Codes


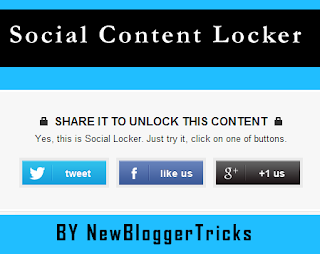
How To Create a Social Content Locker in Blogger Blog

Social Content Locker is Used To Lock Specific text  And Images
You Can Easily Install Social Content Locker By Following Simple Steps


  • Sign in To Your Blogger Account and Select Blog That You Want To ADD This Widget

  • Then Go To Template Tab  >>  Edit HTML

  • Then Add The Below Code Before or Above </head> (Want help to find Click Here)
<link href='http://newblogger-tricks.webege.com/locker.css' rel='stylesheet' type='text/css'/>
  • Now Go To The Post/Page you want to Lock Content And Add Below Code In HTML Tab

<article id="default-usage">
<div class="to-lock" style="display: none;">
<!--Hidden Content Starts (You can Use HTML BELOW)-->
<div style="text-align: center; margin-bottom: 20px;">
<img src="Add_Hidden_Image_Here" alt="" style="margin: auto;" />
</div>

<div style="text-align: justify">
Add Your Hidden Text Here</div>

<!--Hidden Content Ends (You can Use HTML ABOVE)-->

</article>
</div><div id="nbtunlocker"> </div>
<script type="text/javascript" src="http://newbloggertricks.googlecode.com/svn/lock.js"></script>
<script>
jQuery(document).ready(function ($) {
$("#default-usage .to-lock").socialLock({
text: {
header: "Share it To Unlock This Content",
message: "Yes, this is Social Locker. Just try it, click on one of buttons."
},
style: "ui-social-locker-secrets",
buttons: {
order: ["twitter", "facebook", "google"]
},
// twitter options
twitter: {
url: "http://www.newblogger-tricks.com",
text: "Upgrade your social buttons to get more social traffic!"
},
// facebook options
facebook: {
url: "http://www.facebook.com/newbloggertrcks",
appId: "706100816073140"
},
google: {
url: "http://www.newblogger-tricks.com"
}
});
});;;;
</script>


  • For Facebook: Replace http://www.facebook.com/newbloggertrcks  with your Facebook Page.
  • For Twitter: Replace http://www.newblogger-tricks.com with your Website's URL or etc. 
  • For Google+: Replace http://www.newblogger-tricks.com with the URL of your website or post.
  • Replace Add_Hidden_Image_Here with the Image that you want to Hide.
  • Replace "Add Your Hidden Text Here" With the text that you want to hide from users.

Remember: Don't forgot to Add Facebook App ID otherwise the Facebook Like button will not appear properly. i.e. Replace 706100816073140 from above coding.


Friday, 20 September 2013

Best Online Advertising Companies For Web publishers To Make Money

There Are So Many Web Advertising Companies To Make Money Online.Best Of Them Are

1. Google Adsense

It Is The Top Advt Company .It Provides a Free, Flexible way to Earn Money from your Websites, Mobile sites, and site search results with relevant and engaging ads.We Can Earn More By Using Google Adsense.

But It Is Impossible To Get Approved For Google Adsense For Small Websites or Blogs.Because it have Some Guidlines and Terms. 

2.Media.net (Yahoo! Bing Network Contextual Ads)

   It Is Also Best Advt Company .The Yahoo! Bing Network             Contextual Ads program enables web publishers to easily and      effectively earn advertising revenue. Publishers can now use the    Media.net self-serve platform to create and customize ad units that display relevant text ads consisting of sponsored links and ad topics from the Yahoo! Bing Network.

Tips To Get Approved For Yahoo! Bing Network Contextual Ads
  • TLD [ Top Level Domain Name ] - .Com, .Net, .Org etc.
  • Unique, Quality and Acceptable By The Network Content
  • Domain Age = 3/4 Months
  • 40% Organic Search Traffic
  • 1000 Daily Pageviews

3. Chitika Online Advertising Network

 It Is The Most Popular Web Advt Company. It Gives Three Ad Types

  • Text Ads
  • List Ads
  • Mobile Ads
You Can Easily Approved to Chitika..It Is The Best Alternative To Google Adsense If You Have A Small Blog Or WebSite Which Drives <  100 Traffic Per Day 

4. InfoLinks Text Ads

Infolinks' suite of ads is part of a welcome revolution - created to monetize sites with reader interests in mind.

Infolinks ads help publishers earn money from advertising on content they’re already developing for their site.

Main Features Are :
  • Relevant ads while reading related information
  • No disruption to your usual reading experience
5. B4psAds *
It Is Also  Best Web Advt Company
  • B4PSAds technology will help advertisers reach their targeted audiences and increase their ROI.
  • B4PSAds software Rotates, Test Campaigns & Ads, then Score Performance at the end of each day.
  • Campaigns and Ads with higher scores are given Top Priority. This will keep your cost low and profits Higher.
  • B4PSAds technology is designed to find the Winning campaigns and SCALE UP.
  • All of this is done while you sleep. Once you set up B4PSAds campaigns, ads and landing pages, you can sit back and relax while our system works its magic automatically.
Please write comments about this tutorial or tell me any faults which you found while creating and publishing. I will always there to help you...
*This Is by Our Own Review


  • Home
  • About Us
  • Contact Us
  • Write For Us
  • Sitemap
  • Privacy Policy
  • Back To Top